Problem Set #2
Assigned: Apr 9, 2020
Due: Apr 16, 2020
Background
Course Lectures 3, 4, and 5. You only need to watch lecture 5 up to the point
the Matrix class is presented. We will start next week with the CPU model.
You may also want to watch the material on const at 2X speed – there is quite
a bit of detail – and it will be important – but it is not the focus of this
assignment (which is to start writing mathematical C++);
Introduction
Starting with this assignment, we will be building up a small library of
high-performance linear algebra functionality – both performance and
functionality will be built up in successive assignments this quarter.
In this assignment we will be developing some functions for working with
vectors (as defined by the Vector class we developed in lecture).
Vectors are fundamental to scientific computing. As we explore
increasingly large-scale computing platforms, we will be revisiting how
to carry out Vector functionality to take advantage of performance
opportunities. We will do the same with the Matrix class and sparse
matrix classes that we will develop in the coming weeks.
In addition, we will look at some of the particular aspects of writing a function, supporting separate compilation, and how to automate the compilation process.
Preliminaries
In Lecture 4 we introduced vector spaces –- sets of objects that obeyed certain properties with respect to addition and with respect to scalar multiplication.
What that definition did not include was any way to measure the “size” of a vector. Measuring the size of a vector also gives us a way to measure the distance between two vectors; since the difference between two vectors is also a vector, being able to measure the size of a vector also lets us measure the distance between them.
In plane geometry, points in the plane are represented as pairs of numbers, and it is fairly easy to verify the vector space properties with pairs and see that pairs of numbers can represent a vector space.
The figure below illustrates how we customarily think about measuring distances in the plane.
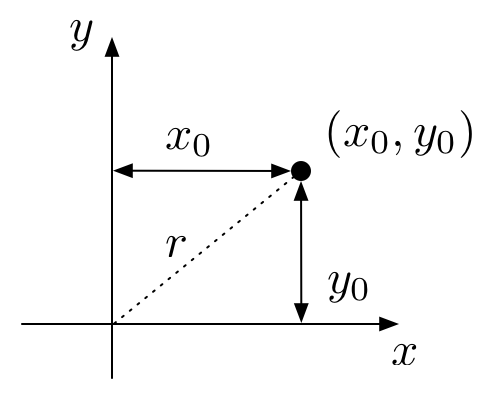
That is, for a vector represented as the pair \((x_0, y_0)\),
the length of that vector, i.e., its distance from the origin, is
We can generalize that notion of distance to \(N\)-tuples of numbers (\(N\)-dimensional vectors) in the following way. Let the vector \(x\) be the \(N\)-tuple of real numbers
We use the shorthand for saying that \(x\) is an \(N\)-tuple of real numbers with the notation
Then, the distance of the vector \(x\) to the origin is
Distance expressed as \(|| \cdot ||\) is called a “norm” and the 2-norm above is also called the Euclidean norm (in analogy to the plane geometry interpretation of distance).
There are two other common norms in numerical linear algebra that can also provide useful notions of distance, respectively the 1-norm and the infinity (or max) norm:
(A vector space with a norm is called a normed vector space; if the vector space is complete in the norm, it is called a Banach space. If the norm is defined by an inner product, it is called a “Hilbert space”.)
As with the definition we had in lecture about vector spaces, any function \(f:V\rightarrow R\) can be a norm on a vector space \(V\), provided it satisfies certain properties:
\(f(x) \geq 0 \:\:\: \text{for all} \:\:\: x \in V\)
\(f(x+y) \leq f(x) + f(y) \:\:\: \text{for all} \:\:\: x, y \in V\)
\(f(\lambda x) = |\lambda| f(x) \:\:\: \text{for all} :\:\: \lambda\in C \:\:\text{and}\:\: x \in V\)
\(f(x) = 0 \:\:\: \text{if and only if} \:\:\: x = 0\)
The interested reader can verify that the 1-norm, 2-norm, and infinity norm defined above satisfy these properties.
More on Visual Studio Code
If you are interested in making better use of Visual Studio Code, Microsoft has a number of tutorials on-line about how to use some of its various features:
I particularly encourage you to explore using Intellisense and how to compile, find errors, and debug from within VS Code.
Warm Up
Extract the homework files
We will be using files as data input and output mechanisms for the computational capabilities we will be developing. As is customary with large software libraries, we will factor the software into multiple files. Regardless of the size of a software project, we will want to start automating the compilation process using make. (As the course progresses we will also be introducing more advanced features of make.)
Create a new subdirectory named “ps2” to hold your files for this
assignment. The files for this assignment are in a “tar ball” that can be
downloaded with this link.

To extract the files for this assignment, download the tar ball and copy it (or move it) to your ps2 subdirectory. From a shell program, change your working directory to be the ps2 subdirectory and execute the command
$ tar zxvf ps2.tar.gz
This will extract all of the files that are contained in ps2.tar.gz. (Tar files are very much like zip files or other files built by programs that bundle multiple files together into one. The name “tar” is originally derived from “tape archive”.)
The files that should be extracted from the tape archive file are
Makefile
Vector.hpp – contains the declaration of the Vector class as developed in lecture 4
Matrix.hpp – contains the declaration of the Matrix class as developed in lecture 5
amath583.hpp – contains declarations for the functions defined in amath583.cpp
amath583.cpp – contains assorted operations on Vectors and Matrices
catch.hpp – header file for the “Catch2” testing framework
CImg.h - header file for CImg image library, used by julia.cpp
julia.cpp – main file for julia.exe
test_*.cpp – files to test the programs you will be writing
verify.bash - bash script to build and run all test programs
Make
The Makefile provided to you has rules for building the various
executables in this assignment. As mentioned in lecture, Makefiles
contain these rules, but make also supports a simple macro language. We
can use this language to achieve similar goals as with any programming
language – to automate repetitive manual tasks, making them repeatable
and consistent.
The ability to define and use macros is one of the most basic, but most powerful, aspects of make. Consider a rule such as one we presented in lecture:
amath583.o  : amath583.cpp amath583.hpp Vector.hpp
          c++ -c amath583.cpp -o amath583.o
This rule will invoke the compilation step with the c++ compiler to
build amath583.o. But note that this rule is extremely specific. The
compiler must be named c++. If there are other flags that are
needed, such as an include path or library, we would have to add those:
amath583.o  : amath583.cpp amath583.hpp Vector.hpp
          c++ -I/usr/include/python2.7 -c amath583.cpp -o amath583.o -lpython2.7
Again, the paths would have to be exactly the ones specified. That would be fine for building just one program in one environment. But suppose, say, you wanted to be able to build multiple executables using the same Makefile. You would need to copy the same paths and compiler name for every executable. More problematically, suppose you want to make these same programs in different environments, where the compiler might have a different name, or the paths might have different names. In that case, you would have to manually edit each line to put in the right compiler name, right paths, etc — and you would have to do this every time you changed environments. And every time you do something manually, there is the opportunity to introduce errors. Suddenly, the automation and ease promised by make doesn’t seem like such a big win.
This is where abstractions comes to the rescue (as it always does) – in this case, in the form of macros. Rather than specifying what compiler we actually want to use, or what compiler flags we pass to it, we can write our rules using placeholders:
amath583.o  : amath583.cpp amath583.hpp Vector.hpp
        $(CXX) $(CXXFLAGS) -c amath583.cpp -o amath583.o
Make will substitute whatever we define CXX to be where it sees
$(CXX) and substitute whatever we define CXXFLAGS to be where it
sees $(CXXFLAGS). Now when we write rules using $(CXX) we are
writing generic rules that can be made specific by how we set CXX et
al.
Try the following experiment in your ps2 directory. First, execute
$ make clean
This is a rule defined at the bottom of the Makefile and deletes all of the generated files in your project (.o and .exe files) as well as other detritus that might have appeared during the compilation and editing process.
Now, issue the command
$ make -n julia.exe
This will process the rules for building julia.exe – but since we are passing the -n option to make – important – make will print out what would be done, without actually doing those things.
You should see something like
c++ -std=c++11 -g -O0 -Wall -c julia.cpp -o julia.o
c++ -std=c++11 -g -O0 -Wall -c amath583.cpp -o amath583.o
c++ -std=c++11 -g -O0 -Wall julia.o -o julia.exe
If you look at the Makefile you will see thes lines
CXX             := c++

OPTS            := -g -O0
LANG            := -std=c++11
PICKY           := -Wall

CXXFLAGS        := $(LANG) $(OPTS) $(PICKY)
These define the macros CXX, OPTS, etc. Note that CXXFLAGS
is defined in terms of three other macros. The convention we will be
using in this course is to separately define different classes of flags
that we might pass to the c++ compiler and then bundle them all together
into the CXXFLAGS macro. We use OPTS for setting optimization
level (and debugging level), LANG to set the C++ language level, and
PICKY to set how picky we want the compiler to be when processing
our code. The options here indicate to use no optimization, c++11 as the
language level, and to use maximum pickiness when compiling.
Do you recognize the values of each of these macros in the text that was printed when you invoked “make -n julia.exe”?
To see how the macros work, make a temporary change to the Makefile by
changing LANG to be
LANG := -std=c++17
Invoke make -n julia.exe again. Is there a difference between what
was printed the first time and what was printed now?
Be aware that the macro processing is simple text processing, it has no
actual meaning relative to what flags the compiler actually supports or
what the compilation process actually is. We choose CXX and LANG
and so forth as aids for our own comprehension of what we are trying to
accomplish. For example, you could put an invalid flag into a macro and
make would still invoke the command – and you would see the resulting
error from the compiler when it is invoked.
Edit your Makefile again, this time adding a nonsense string to LANG
e.g.,
LANG := -std=c++17 asdfasdfasdf
- What happens when you invoke
make -n julia.exemake julia.exemake -k julia.exe
Important
We didn’t discuss what make would do in the case of
errors. In the default case, if it is unable to build a target due to
some error, it will halt and not build any other targets. If you pass
the -k option, it will continue past the error and attempt to build as
many targets as it can.
Lastly. If you look at the lines in the Makefile, there is still alot of repetition. Not repetition in the exact text, but repetition in the following sense. For the rules that build .o files, there is a rule for the .o, the corresponding .cpp dependency and a compilation step to turn that .cpp into a .o.
Every time you see repetition you should be thinking about how to create
rules and process so that the repetitions can be made by the computer
rather than you. In a future assignment we will look at how these kinds
of patterns can also be handled by make.
Defensive Programming and Assertions
Maurice Wilkes was one of the founders of modern computing and, in some sense, of debugging. One of his most poignant quotes is:
It was on one of my journeys between the EDSAC room and the punching equipment that “hesitating at the angles of stairs” the realization came over me with full force that a good part of the remainder of my life was going to be spent in finding errors in my own programs.
Over the years, defensive programming has evolved as a set of
techniques that can be used to help you find your own errors. One
fundamental part of the process of defensive programming is to develop
your program so that it supports two different modes of compilation and
execution: debug mode and release mode. In debug mode, a program is
first of all, compiled to enable use of a symbolic debugger (using the
-g flag to the compiler). In addition, the program itself includes
self-checks, or assertions, (inserted by the programmer) to insure
that necessary program invariants hold.
Assertions
Note that these self-checks (assertions) are not the same as error-checking. Assertions are there to catch mistakes that you make while programming, which mistakes would result in erroneous behavior and/or catastrophic failure of your program. Error-checking catches mistakes that the user of your program makes and is part of normal program logic for a correctly functioning program. Incorrect logic (aka “bugs”) are errors that are not part of normal program logic and are what we want to try to prevent with assertions. Importantly, assertions are removed (automatically) from the release mode of the program, whereas error-checking is always enabled.
Correct program logic depends on invariants holding during the course of
execution. During development and debugging it can be useful to check
these invariants and to terminate the program at the point where an
invariant is violated. C and C++ provide a checking facility for
asserting such invariants in the <cassert> header.
There is a concise description of the principles of using assert
here: http://bit.ly/2o9THxq . Exactly how and where to use assert
when you are programming will largely be up to you, but you should add
it to your arsenal of tools and techniques for programming in this
course (and beyond) so that the remainder of your life can be spent
doing more interesting things things than finding errors in your own
programs.
An assertion statement will print a message and cause a program to halt
if the assertion fails, that is, if the expression passed to it
evaluates to false or, equivalently, to zero (false and zero are
essentially the same value in C/C++). As mentioned above, assert
statements are removed from your program for its release mode. This
removal is done functionally rather than physically –- you don’t
actually go through the code and remove the assert statements.
Rather, they are turned into empty statements in a preprocessing step by
the compiler if the macro NDEBUG exists in the environment prior to
inclusion of the header file <cassert>. Try the following three
programs (assert0.exe, assert1.exe, and assert2.exe in your Makefile).
#include <iostream>
#include <cassert>
using namespace std;

int main() {
  assert(1 == 1 && "This is true");       // will not be triggered
  assert(1 == 0 && "This is never true"); // will be triggered
  cout << "Hello World" << endl;
  return 0;
}
#define NDEBUG

#include <iostream>
#include <cassert>
using namespace std;

int main() {
  assert(1 == 0 && "This is never true"); // will be triggered
  cout << "Hello World" << endl;
  return 0;
}
#include <iostream>
#include <cassert>
using namespace std;

#define NDEBUG


int main() {
  assert(1 == 0 && "This is never true"); // will be triggered
  cout << "Hello World" << endl;
  return 0;
}
Which version prints “Hello World”?
The technique of using the logical
“and” operation (&&) in addition to a string lets you include a helpful
message when the assertion line is printed when there is a failure. The
string is not necessary: assert(1==0) would be sufficient to trigger
a failed assertion.
Note
What you pass to assert is something you expect to always
be true for correct operation of the program and, again, is a check
that will be removed for the release mode of your program. For example
in the sqrt example we have been using in lecture you might include
an assertion that the input value is non-negative:
double sqrt583(const double& y) {
  assert(y >= 0);

  double x = 0.0, dx;
  do {
    dx = - (x*x-y) / (2.0*x);
    x += dx;
  } while (abs(dx) > 1.e-9);

  return x;
}
-DNDEBUG
Making sure the assertions are removed is an important distinction
between debug and release modes of a program. We have seen how they can
be elided with the use of the NDEBUG macro. But if we think about
how we would switch between debug and release mode in this way – we
would be (manually) inserting and remove NDEBUG from all of our
files every time we changed modes. And we are sure to make mistakes (not
to mention waste time) in doing so. At this point you should be thinking
“hmm, doing something boring and repetitive by hand – there must be a
way to automate that.” And in fact there is. One can pass macros to the
C++ compiler from the command line using the -D flag. I.e., to
define NDEBUG, we add -DNDEBUG to the set of flags we pass to
the compiler. And we already know how to do that in an automatic and
repeatable fashion: add it to a macro that ends up in CXXFLAGS. We
will use OPTS for that in this course.
(In general, avoiding work for the sake of avoiding work is called “laziness” and is not considered to be a virtue. However, in the context of programming, we are avoiding boring and repetitive and mindless work so that we can instead focus our energy on interesting and challenging tasks. This kind of laziness is a virtue. It also sometimes leads one not to just use tools to save time – but to develop altogether new tools. In this case you might end up spending more time developing your time saving tool than the time you actually save. Moderation is also a virtue.)
Compiler Pickiness
Since a compiler is built to translate a program written in a given
program language, it can also be used to analyze how programs are
written. Both clang (llvm) and g++ use the flag -Wall to enable
pickiness, meaning the compiler will issue warnings for just about
anything in your program that might be suspect. Warnings are not fatal,
your program will still compile and run if warnings are issued. But, as
part of defensive programming, your programs should always compile
cleanly with -Wall enabled. For maximal pickiness you can additionally
use -Wextra and -pedantic.
Important
Your code should always compile cleanly with -Wall enabled. No warnings and no errors.
Language Level Support
The C++ programming language is still being actively extended and improved upon by the ISO standards committee responsible for it. There are four versions of the language that represent major milestones in the evolution of the language: C++98, C++11, C++14, C++17. Soon there will be a fifth: C++20. (The committee is targeting a new release every three years at least through C++26.)
Although standards are developed (and named) by the standards committee, it does take some time for compilers as well as programs themselves to catch up to the standards. Although it is currently 2020, the default level of language support for clang and g++ is still C++98. This is a reflection more that the vast majority of extant C++ code is written in C++98 than it is a reflection of the timeliness of the compiler writers.
To specify a given level of language support (to enable certain features that are in one that are not in an earlier one), we can pass one of the following flags to the compiler: “-std=c++11”, “-std=c++14”, or “-std=c++17”. Since C++17 is still fairly new, you should not expect it to be fully supported at this time (but neither will you need to use many of its features, if any at all).
For this course you are welcome to use any level of the C++ language that you like, as long as it is at least C++11.
Exercises
In this assignment we will be using a combination of specified test scripts and testing code to verify behavior of your programs. Your programs will be graded against the expected behavior with the tests that your are provided, as well as with additional tests that only the TAs will apply.
The test script for this assignment is verify.bash. It will run
through a set of tests for each of the exercises below, indicating
whether the program has passed or failed that particular test. For most
of the executables that you will be asked to write, the script will
attempt to build the executable using the “make” command and then to run
the program.
You can run the test script by invoking
$ bash verify.bash
Some of the programs that will be build are themselves testing programs that will exercise different aspects of the functions that you will be asked to write. Partial credit will be given in these cases for the parts of the program that do pass their internal tests, even if the executable itself does not pass as a whole. We will discuss program testing in future assignments.
Assertions
In your subdirectory there is also a file assert3.cpp that has the same assertions as assert1.cpp and assert2.cpp – but without NDEBUG being defined in the program. Modify the rule for compiling assert3.exe – do not modify assert3.cpp – so that the assertion in assert3.exe will not be triggered.
Note
As a reminder – this contrived example is to show the behavior of assert() and NDEBUG. In practice, we don’t insert NDEBUG so that failing assertions will no longer fail. We insert NDEBUG so that the function call overhead of calling the assert() function will not be present – once all assertions pass.
Zeroize
In the file amath583.cpp are five functions, three of which you need to complete and two of which are already written as examples. You will also need to add some functions from scratch. Every function that is defined in amath583.cpp also needs to be declared in amath583.hpp.
Complete the definition and declaration of zeroize() in amath583.hpp
and amath583.cpp. This function should take a Vector as an argument and
fill each entry of the Vector with a zero.
This function will be tested by linking amath583.o against
test_zeroize.o to create test_zeroize.exe.
Vector Norm
The file amath583.cpp contains an implementation of one_norm as follows
double one_norm(const Vector& x) {
  double sum = 0.0;
  for (size_t i = 0; i < x.num_rows(); ++i) {
    sum += std::abs(x(i));
  }
  return sum;
}
The corresponding declaration in amath583.hpp is:
double one_norm(const Vector& x);
Complete the bodies of two_norm() and inf_norm() which
respectively compute and return the two norm and infinity norm of the
Vector that is passed in as a parameter.
These functions will be tested by linking them with test_norms.o which contains a series of unit tests that check different expected behavior of the norm computations.
Inner Product
Add a function called dot to amath583.cpp and amath583.hpp
(definitions and declaration). The function should take two vectors as
arguments and return their inner product (the sum of the pairwise
products of each corresponding entry in the vectors).
The tests for this function are in test_dot.cpp, which should be
compiled as with the other test programs into test_dot.exe.
Extra credit (483 only)
Implement a function two_norm_d() using dot().
The tests for this function are in test_norm_d.cpp, which should be
compiled as with the other test programs into test_norm_d.exe.
Matrix Norm
If we consider a typical vector space of N-tuples, e.g., \(R^N\) to \(R^M\) (say) is the set of all \(M \times N\) matrices. But, if we think about the kinds of things we can do with a matrix we can add them, scale them, etc – all the things we can do with objects of a vector space. And, in fact, \(M\times N\) matrices over a field, form a vector space. If the field is the real numbers, we write \(R^{M\times N}\).
Just as with other kinds of vectors, it is useful to define a norm over matrices. One simple option would be to just “unravel” the matrix into an \(M \times N\) vector and use one of our vector norms. That would be a norm for the matrix in some sense, but in linear algebra we are often more interested in how a matrix behaves as an operator and we would like for matrix norm to capture something about the operator-ness of the matrix. This kind of norm is called an induced norm and is defined as follows.
If \(\| \cdot \|\) is a norm on any n-dimensional vector space, e.g., \(R^n\), then the induced matrix norm of a matrix \(A\in R^{M\times N}\) is given by
For the one norm we then have
And for the infinity norm we have
The vector norms we looked at earlier are specific cases of \(p\)-norms, defined as
While it is straightforward to compute these with vectors using addition, subtraction, multiplication, etc. The only directly computable (meaning computable in a fixed number of steps) induced \(p\)-norms for a matrix are the 1-norm and the \(\infty\)-norm.
We can implement the 1-norm for the Matrix class we defined in lecture like this:
double one_norm(const Matrix& x) {
  double sum = 0.0;
  for (size_t j = 0; j < x.num_cols(); ++j) {  // for each column
   double tmp = 0.0;
   for (size_t i = 0; i < x.num_rows(); ++i) { // compute column sum
     tmp += std::abs(x(i, j));
   }
   sum = std::max(sum, tmp);
  }
  return sum;
}
Important
Although it may be difficult to appreciate in an academic setting, code is primarily a communication mechanism among developers. For this course it is between you and the instructional staff – but it is also between yourself and yourself – you will go back and read your own code.
One aspect of making code an effective communication mechanism is adopting a common set of conventions – how things are named, how things are indented, and so forth. You will notice that all of my code is indented in exactly the same way. Some of that is enforced via editor configuration and some via post-processing using (in my case), the clang-format tool.
Another convention that I use in this course (and elsewhere) is to iterate through rows
using the variable i and through columns with the variable j. I also typically
(if it is okay for the algorithm) loop through rows on the outer loop and the columns on
the inner loop. (Since we are using row-oriented matrices, this also turns out to be
most efficient – we will explore the efficiency aspect in later assignments.)
Similarly, as you will have seen in your math texts, we adopt conventions for naming of
of other variables (and, since we are writing math software, we share them):
e.g., x is a Vector, A is a Matrix.
You can apply the same formatting for all of your projects (or all files within a project)
by saving the settings in a .clang-format file, either in the project directory or
in your home directory. The settings I use are in
this file, which you are welcome
to use (and modify).
Remember that in C++, we can have functions with the same name as long as the types of
the arguments differ (overloading), so we can have a one_norm for Vector and a
one_norm for Matrix.
One seemingly obvious extension from the vector two norm to matrices is the following
However, this is not the induced matrix two-norm, rather it is called the “Frobenius” norm. Rather, the matrix two-norm is the largest singular value of the matrix \(A\). While this is computable (and we will be computing the singular value decomposition later in the course), it is not computable in a specified finite number of steps (though the iterations involved do converge quite rapidly). No other matrix \(p\)-norms are computable at all.
(583 ONLY)
Implement the \(\infty\)-norm for a Matrix. You will need to add the
definition to amath583.cpp and the declaration to amath583.hpp.
The tests for this function are in test_matrix_norm.cpp, which should be
compiled as with the other test programs into test_matrix_norm.exe.
Extra credit
Implement the F-norm for a Matrix as a function \(f_norm()\).
You will need to add the definition
to amath583.cpp and the declaration to amath583.hpp.
The tests for this function are in test_f_norm.cpp, which should be
compiled as with the other test programs into test_f_norm.exe.
Julia Sets
Julia sets are the name given to sets that exhibit complex or “chaotic” or “fractal” behavior. Interestingly, Newton’s method (described in week 1) applied to problems with complex values can exhibit chaotic behavior even for very simple functions.
In fact, computing the cube-root of a complex number using Newton’s method (or, more generally, finding the complex root of a polynomial) can generate quite interesting sets. There are different ways of visualizing the complex behavior of Newton’s method in this case. One way is to simply count the number of iterations required for the algorithm to converge, and apply the method across a range of the complex plane.
The file julia.cpp is a program for doing a simple visualization in this way.
The C++ standard library includes a complex (template) class, with overloads for all of the standard arithmetic operations – it can be used just like a built-in numeric type.
The program should be fairly easy to understand. It iterates through the pixels in a 1024 by 1024 array (the screen) and converts each pixel location to a complex number. The x coordinate is the real part of the complex number and the y coordinate is the imaginary part. It then calls Newton’s method to solve \(f(x) = 0\), using the number we pass as the initial value. The program colors the pixel based on the number of iterations required for convergence. To make some interesting colors rather than just gray scale, we scale up the red, green, and blue channels by different factors.
The area of the complex plane that is covered by the algorithm is controlled by
two parameters in the program: stretch and origin:

The default values of stretch and origin are 2.5 and (0, 0), respectively.
The part of the program that is not written are the bodies of f()
and fp() (the function and its derivative). In class we constructed
these for computing the square root.
For this exercise you just need to fill in those two functions for computing a root of the polynomial
The function f() should compute \(f(x)\) as above, while
fp() should compute its derivative.
The test for this program will compile and run it, verifying that the output image is produced.
Again, although we are using complex numbers, which have a real and imaginary parts, we can express the complex arithmetic with the complex numbers – we don’t have to work directly with the real and imaginary parts.
Note
There is an important principle here. We are expressing the computation we want generically – independently of the types we are working with.
If your functions are correctly defined, when the program runs it will create an image file called “julia.bmp” that looks like the following when visualized.

Tip
If your program starts to run but does not complete after some time, or if your image comes out looking differently than the above (e.g., all black), double check the functions you implemented.
I encourage you to experiment with some different polynomials (or even trigonometric functions) and see
what kinds of images you can generate. You can also experiment with different values of stretch and
origin to view different regions of the complex plane, as well as different scalings of the color planes.
If you have some particularly interesting results, please share them and I can create a small gallery on the course web site.
Turning in The Exercises
Do a make clean in your ps2 directory and then create a tar ball ps2.tar.gz containing all of the files in that directory. From within the ps2 directory:
$ cd ps2
$ make clean
$ cd ..
$ tar zcvf ps2-submit.tar.gz ./ps2
Note that this does something slightly different than the ps2.tar.gz that you downloaded. The one you downloaded included all of the files, but not in a separate subdirectory. When you extracted them, they extracted into the same directory where you invoked the tar command. For your submission you are creating an archive of the ps2 subdirectory and the files within it. When you extract these files, tar will first create a ps2 subdirectory and extract the files into that.
Upload your tarball to Canvas.
You can see how this works by copying the tarball to, say, /tmp and extracting there.
$ cp ps2-submit.tar.gz /tmp
$ cd /tmp
$ tar zxvf ps2-submit.tar.gz
Among whatever other files are in /tmp, you should also see a new subdirectory, ps2, inside of which are your homework files. If you do this on a public computer, make sure to delete the ps2 directory when you are done since /tmp is readable by all users on the computer.
If you relied on any external references, include a file ref2.txt in
your tarball as well.